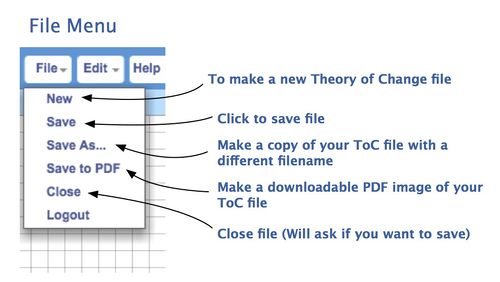
(→Edit Menu) |
|||
| (22 intermediate revisions by the same user not shown) | |||
| Line 1: | Line 1: | ||
| − | |||
| − | |||
The “canvas” is where you create the ToC graphic of outcomes connected to one another in causal pathways. The canvas opens up when you open an existing TOCO file by clicking on the title in your file browser, or when you create a new TOCO file. | The “canvas” is where you create the ToC graphic of outcomes connected to one another in causal pathways. The canvas opens up when you open an existing TOCO file by clicking on the title in your file browser, or when you create a new TOCO file. | ||
Many operations on the drawing canvas are available on the Edit menu. These functions include creating new outcomes, comments, text boxes, titles, color legend, and the dashed accountability line. Here too are items for editing assumptions and the ToC narrative, and for switching from right-angled to straight-line connectors. | Many operations on the drawing canvas are available on the Edit menu. These functions include creating new outcomes, comments, text boxes, titles, color legend, and the dashed accountability line. Here too are items for editing assumptions and the ToC narrative, and for switching from right-angled to straight-line connectors. | ||
| Line 7: | Line 5: | ||
== Editing and Moving Graphic Objects == | == Editing and Moving Graphic Objects == | ||
| − | To delete an outcome box, text box, comment, connector or curved line, | + | To delete an outcome box, text box, comment, connector or curved line, use the delete button on your keyboard or use the trash can icon found on the top menu bar. |
| − | Outcome boxes | + | Outcome boxes, text boxes, comments, and the color legend may be moved by clicking and dragging. |
===Outcome Box, Text Box, Comment Box=== | ===Outcome Box, Text Box, Comment Box=== | ||
| − | + | <br clear=all> | |
| − | Outcome box objects are edited in the Outcome Editor and can be dragged and dropped anywhere on the canvas. You can access the Outcome Editor by double-clicking the outcome box object | + | Outcome box objects are edited in the Outcome Editor and can be dragged and dropped anywhere on the canvas. You can access the Outcome Editor by double-clicking the outcome box object. |
| − | + | <br clear=all> Most objects on the TOCO canvas, including text boxes, require toggling between Edit mode and Move mode. When you double click on a text box it is in Edit mode and the Text Editor panel is open. All editing is done in the Text Editor. When you want to move the object, close out the editor and then you can drag the object where you want it. To update content, double-click again and the edit panel will open. | |
| − | + | [[File:Comment feature.jpg|border|500px|]] <br clear=all> Comment feature is for collaborative work. Select "Add comment" from the Edit menu. You can edit comments right inside the "Comment Box" object. You type right into the object rather than into an editor panel. The comment is automatically signed with your user name. No font or color fill choices! | |
| − | + | ||
| − | [[File:Comment feature.jpg|border|500px|]] <br clear=all> Comment feature is for collaborative work. Select "Add comment" from the Edit menu. Comment | + | |
| − | + | ||
| − | + | ||
===Outcome Box Editor=== | ===Outcome Box Editor=== | ||
| Line 30: | Line 24: | ||
===Color Legend=== | ===Color Legend=== | ||
| − | [[File:Color Legend.jpg|500px|]] <br clear=all> The Legend explains the significance of your outcome colors. Right-click on color legend to edit text or move legend box. Click on the X in upper right to delete the legend object | + | [[File:Color Legend.jpg|500px|]] <br clear=all> The Legend explains the significance of your outcome colors. Available from Edit menu or Canvas Tool Panel. Right-click on color legend to edit text or move legend box. Click on the X in upper right to delete the legend object. |
| − | + | ||
| − | + | ||
| − | + | ||
| − | + | ||
==Connector Editor (Rationales, Interventions)== | ==Connector Editor (Rationales, Interventions)== | ||
| Line 40: | Line 30: | ||
[[File:Double click on arrow to add R or I.jpg|500px|]] <br clear=all> Add rationales and interventions to the ToC by way of the Connector Editor. To open the Connector Editor, double-click on the connector. Editor panel opens up, as shown. It has a tab for Rationales and a tab for Interventions. Enter text for each in the text field. You can add multiple interventions. Connector Editor offers font choices and fill color in case you want to display the rationale or intervention text on the ToC graphic. To do so check the "Show full text" checkbox. Otherwise TOCO displays the rationale or intervention in code. | [[File:Double click on arrow to add R or I.jpg|500px|]] <br clear=all> Add rationales and interventions to the ToC by way of the Connector Editor. To open the Connector Editor, double-click on the connector. Editor panel opens up, as shown. It has a tab for Rationales and a tab for Interventions. Enter text for each in the text field. You can add multiple interventions. Connector Editor offers font choices and fill color in case you want to display the rationale or intervention text on the ToC graphic. To do so check the "Show full text" checkbox. Otherwise TOCO displays the rationale or intervention in code. | ||
| − | + | <br clear=all> Connector shape and color settings are available on the Canvas Tool Panel. Click once on the connector to select it. Edit line weight, color and shape from the icons on the Tool Panel. | |
| − | + | ||
| − | + | ||
[[File:Intervention .jpg|600px|]] <br clear=all> How to edit, add, delete interventions on a connector. Default mode is code display; check the box to display in full text. If full text, Connector Editor gives you choices as to font, font size, color and formatting, and fill color. | [[File:Intervention .jpg|600px|]] <br clear=all> How to edit, add, delete interventions on a connector. Default mode is code display; check the box to display in full text. If full text, Connector Editor gives you choices as to font, font size, color and formatting, and fill color. | ||
[[File:Rationale Full text .jpg|600px|]] <br clear=all> How to edit, add, delete rationales on a connector. Default mode is code display; check the box to display in full text and use the text and fill formatting functions as needed. | [[File:Rationale Full text .jpg|600px|]] <br clear=all> How to edit, add, delete rationales on a connector. Default mode is code display; check the box to display in full text and use the text and fill formatting functions as needed. | ||
| − | |||
| − | |||
| − | |||
| − | |||
| − | |||
| − | |||
| − | |||
| − | |||
| − | |||
| − | |||
| − | |||
| − | |||
= File Menu = | = File Menu = | ||
[[File:File menu.jpg|500px|]] | [[File:File menu.jpg|500px|]] | ||
| − | |||
| − | |||
| − | |||
| − | |||
| − | |||
| − | |||
| − | |||
| − | |||
| − | |||
| − | |||
| − | |||
| − | |||
| − | |||
| − | |||
| − | |||
| − | |||
| − | |||
| − | |||
| − | |||
| − | |||
| − | |||
| − | |||
| − | |||
Latest revision as of 13:57, 10 June 2021
The “canvas” is where you create the ToC graphic of outcomes connected to one another in causal pathways. The canvas opens up when you open an existing TOCO file by clicking on the title in your file browser, or when you create a new TOCO file. Many operations on the drawing canvas are available on the Edit menu. These functions include creating new outcomes, comments, text boxes, titles, color legend, and the dashed accountability line. Here too are items for editing assumptions and the ToC narrative, and for switching from right-angled to straight-line connectors.
Contents
Editing and Moving Graphic Objects
To delete an outcome box, text box, comment, connector or curved line, use the delete button on your keyboard or use the trash can icon found on the top menu bar.
Outcome boxes, text boxes, comments, and the color legend may be moved by clicking and dragging.
Outcome Box, Text Box, Comment Box
Outcome box objects are edited in the Outcome Editor and can be dragged and dropped anywhere on the canvas. You can access the Outcome Editor by double-clicking the outcome box object.
Most objects on the TOCO canvas, including text boxes, require toggling between Edit mode and Move mode. When you double click on a text box it is in Edit mode and the Text Editor panel is open. All editing is done in the Text Editor. When you want to move the object, close out the editor and then you can drag the object where you want it. To update content, double-click again and the edit panel will open.
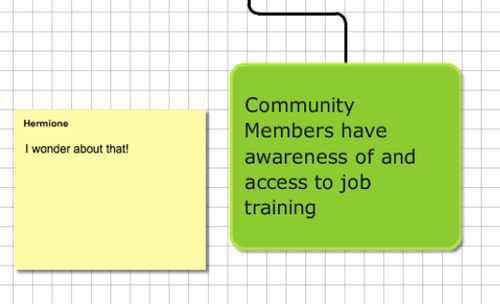
Comment feature is for collaborative work. Select "Add comment" from the Edit menu. You can edit comments right inside the "Comment Box" object. You type right into the object rather than into an editor panel. The comment is automatically signed with your user name. No font or color fill choices!
Outcome Box Editor
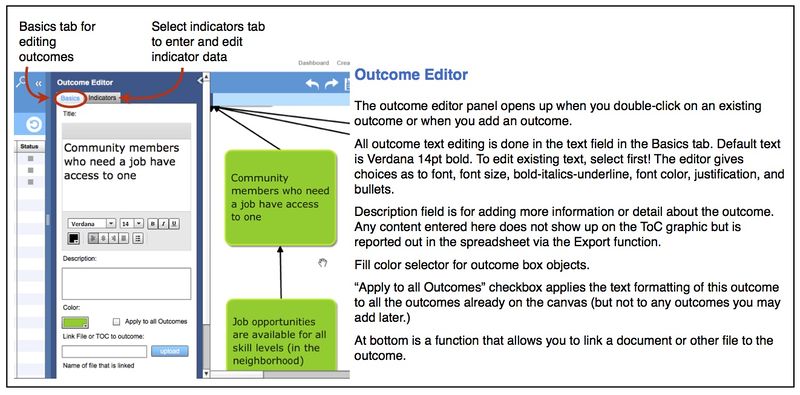
Select text first to change formatting. Select a word or phrase within the outcome to apply different format, e.g., bold or italic.
Color Legend
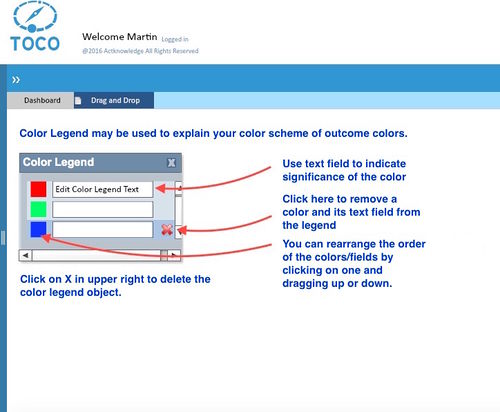
The Legend explains the significance of your outcome colors. Available from Edit menu or Canvas Tool Panel. Right-click on color legend to edit text or move legend box. Click on the X in upper right to delete the legend object.
Connector Editor (Rationales, Interventions)
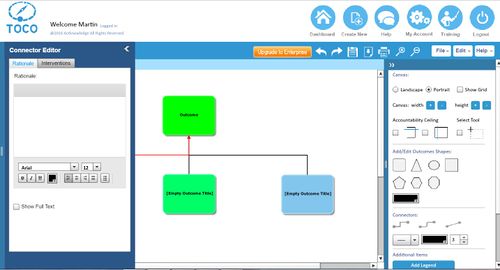
Add rationales and interventions to the ToC by way of the Connector Editor. To open the Connector Editor, double-click on the connector. Editor panel opens up, as shown. It has a tab for Rationales and a tab for Interventions. Enter text for each in the text field. You can add multiple interventions. Connector Editor offers font choices and fill color in case you want to display the rationale or intervention text on the ToC graphic. To do so check the "Show full text" checkbox. Otherwise TOCO displays the rationale or intervention in code.
Connector shape and color settings are available on the Canvas Tool Panel. Click once on the connector to select it. Edit line weight, color and shape from the icons on the Tool Panel.
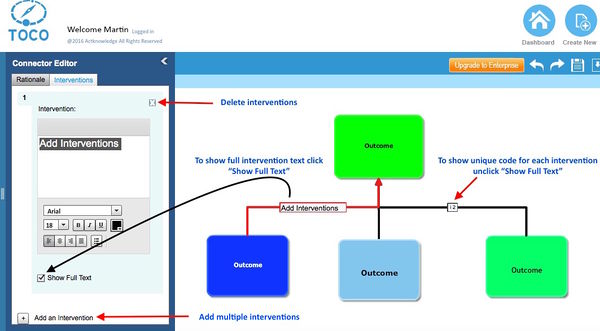
How to edit, add, delete interventions on a connector. Default mode is code display; check the box to display in full text. If full text, Connector Editor gives you choices as to font, font size, color and formatting, and fill color.
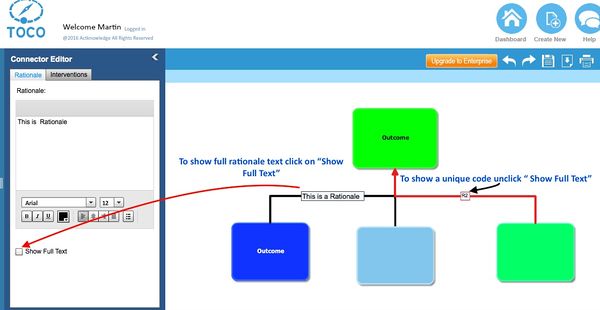
How to edit, add, delete rationales on a connector. Default mode is code display; check the box to display in full text and use the text and fill formatting functions as needed.
